Loose storm shutters usually need fastener, anchor, track, or alignment repairs before another severe storm arrives. In Miami-Dade, the hurricane season lasts six months, from June 1 through November 30. The county also lists approved shutter systems tested for pressures reaching 200 psf. For masonry repairs, heavy duty concrete masonry anchors can provide stronger attachment when the substrate supports them.
Key Takeaways
- Inspect loose shutters before tightening anything.
- Identify whether the movement comes from hardware or the wall.
- Replace damaged anchors instead of repeatedly tightening them.
- Use corrosion-resistant hardware suited to coastal conditions.
- Follow the shutter manufacturer’s approved installation details.
- Hire a qualified professional when structural damage appears.
Start With a Careful Shutter Inspection
First, open and examine the shutter system without forcing any stuck component. Check every fastener, anchor, hinge, track, locking point, and mounting surface. Miami-Dade County requires approved storm protection products for many installations, so identify the existing system first.
Next, gently test the shutter for movement with your hand. A small amount of normal operational movement differs from movement at the mounting connection. If the entire frame shifts against the wall, focus on the anchors before adjusting the shutter itself.
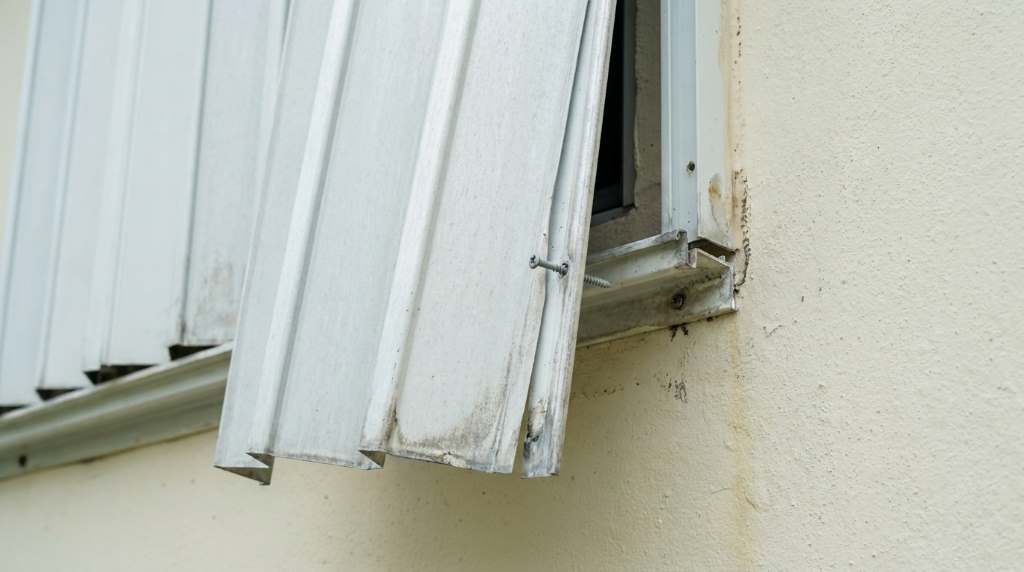
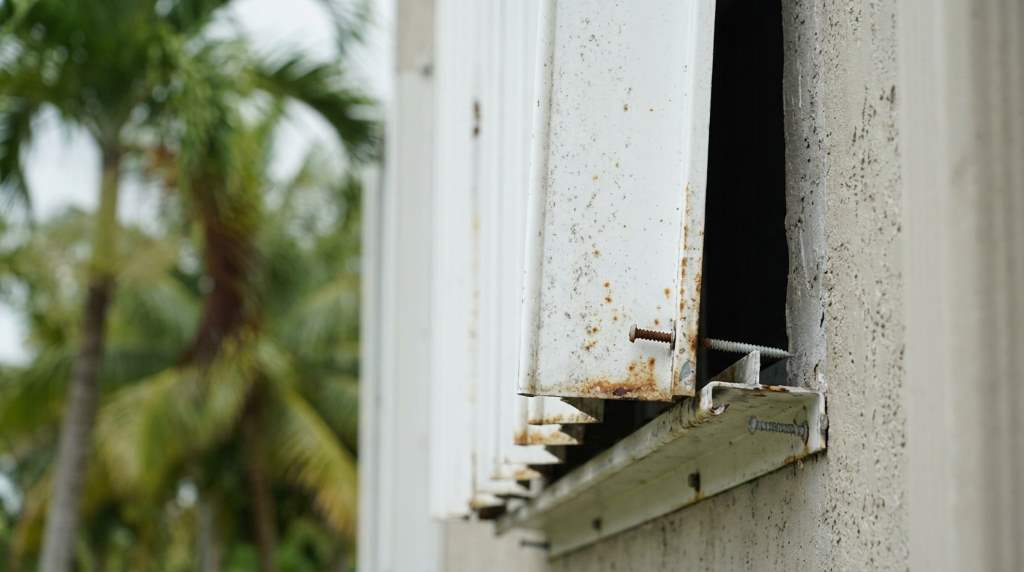
Look closely for cracked masonry, enlarged holes, rust stains, bent tracks, or missing screws. These signs often reveal why a shutter gradually becomes loose. Also inspect stucco around the attachment points because damaged finishes can hide deeper substrate problems.
For permanent systems, check the manufacturer’s label or approval information whenever possible. Miami-Dade maintains a product approval database covering storm panels, accordion shutters, roll-down systems, and other products. Therefore, avoid replacing approved hardware with random fasteners that may change the system’s performance.
Before starting repairs, photograph each damaged connection and record its location. This simple step helps you compare every opening and spot repeated installation problems. It also gives a contractor useful information if professional repair becomes necessary.
Check Anchors, Fasteners, and Mounting Surfaces
Loose anchors cause many shutter problems, especially when repeated wind loading stresses the same connection. Remove only hardware that clearly requires replacement, then inspect the surrounding material carefully. Never assume a larger screw automatically creates a stronger connection.
Concrete and masonry require compatible anchors with correct diameter, embedment, spacing, and edge distance. Follow the shutter approval documents because connection requirements can vary between products. For related exterior projects, understanding trending balustrade styles can also help when evaluating nearby railing attachments.
If an anchor spins without tightening, stop turning the tool immediately. Spinning often indicates substrate damage, incorrect installation, or a failed anchor mechanism. Pulling harder can enlarge the hole and reduce the remaining holding strength.
For masonry, remove failed anchors and clean the hole according to the replacement anchor instructions. Then install the approved anchor using the specified setting method and embedment depth. Never guess the required torque when the manufacturer’s instructions provide a specific value.
Wood framing requires a different approach because the fastener must engage adequate structural material. A screw placed only into thin sheathing cannot provide dependable hurricane resistance. If you cannot confirm the framing location, expose enough material for proper assessment.
Metal framing also needs careful evaluation because thin-gauge material may not support the original connection. In that situation, a qualified installer may need an approved reinforcement method. Avoid improvising a connection that changes the tested shutter assembly.
When an Anchor Hole Looks Damaged
A damaged hole requires more than simply inserting another screw. First, determine whether the surrounding masonry remains solid and whether the hole has excessive enlargement. Then match the repair method to the approved shutter connection.
Do not fill a failed anchor hole with ordinary household caulk or construction adhesive. Those materials cannot substitute for an engineered anchoring system. Instead, use only a repair method accepted for the shutter and substrate.
If several anchors have failed around one opening, investigate the entire connection. Multiple failures can indicate excessive movement, substrate deterioration, or an unsuitable installation. A professional assessment becomes especially important when cracks extend beyond the immediate mounting area.
Repair Loose Tracks and Misaligned Shutters
Sometimes the anchors remain tight while the shutter still feels loose during operation. In those cases, inspect the tracks, guides, hinges, rollers, stops, and locking hardware. Dirt, corrosion, bent components, and worn hardware can create movement that resembles a loose wall connection.
Clean tracks using a method approved by the manufacturer, then remove debris from corners and drainage areas. Never grind or drill a track to make a damaged component fit. Altering the profile can interfere with the system’s tested performance.
For roll-down shutters, check whether the curtain travels evenly through both guides. A crooked curtain can place unusual pressure on one side of the assembly. Correct the alignment before tightening unrelated hardware.
Accordion shutters need special attention around their tracks and center locks. Examine the top and bottom tracks for separation, damaged fasteners, or unusual gaps. Miami-Dade testing procedures specifically evaluate accordion shutter components and anchoring arrangements.
Storm panels require another inspection method because the panels depend heavily on their attachment points. Check each panel, washer, screw, bolt, and receiving anchor before installation. Replace damaged components with hardware compatible with the approved system.
When several components show corrosion, consider replacing the affected hardware as a complete set. Coastal air accelerates corrosion, especially around exposed metal connections. Stainless or otherwise approved corrosion-resistant hardware can provide better durability when specified by the manufacturer.
Before reinstalling a panel system, confirm every opening uses the correct panel and attachment pattern. Mixing components from different systems can create an unreliable assembly. If identification becomes difficult, compare the hardware with the product approval documentation.
Restore Proper Shutter Operation Before Storm Season
Once the mounting connections remain secure, test the shutter through its full operating range. It should open, close, lock, and release without excessive force. Resistance often signals alignment problems that deserve attention before the next storm.
Check every lock individually instead of assuming one functioning lock secures the entire opening. A partially engaged lock can leave the shutter vulnerable during strong wind. Mark any lock that feels stiff, loose, or incomplete.
For manual roll-down systems, operate the shutter slowly and watch both sides. Uneven movement can indicate guide damage, curtain distortion, or tension problems. Never force the shutter downward when it catches repeatedly.
For accordion systems, move the blades through their full travel before engaging the center lock. Confirm that the blades stack correctly without binding or jumping from the track. Replace visibly damaged components rather than forcing them back into position.
For removable storm panels, organize the panels by opening before severe weather threatens. Labeling each panel reduces installation errors and speeds up preparation. You can also review solar panel installation time to understand why exterior projects need careful scheduling before storm preparation.
After repairs, conduct a final visual inspection from inside and outside the opening. Confirm that every required connection remains engaged and that no fastener stands unusually proud. Then test the shutter again using normal operating pressure.
Know When DIY Repairs Should Stop
Simple cleaning, visual inspection, and minor hardware adjustments may suit experienced homeowners. However, structural anchor repairs require greater care in Miami-Dade’s high-wind environment. Stop the project when you cannot verify the correct connection method.
Call a qualified professional when masonry has significant cracks, anchors repeatedly fail, or mounting surfaces have deteriorated. Professional help also makes sense when the shutter lacks identification or approval information. These situations can involve structural and code-related concerns beyond routine maintenance.
Do not repair shutters immediately before a hurricane using unapproved substitutions. Rushing often leads to incorrect spacing, shallow embedment, mismatched hardware, or incomplete locking. Those shortcuts can undermine an otherwise strong storm protection system.
Professional assistance also becomes important when the shutter protects a large opening or sits above difficult access areas. Working from ladders or elevated positions introduces additional hazards. A trained installer can evaluate the connection while following safer access procedures.
If your home has several loose shutters, repair them systematically rather than addressing only the most visible problem. Create a simple opening-by-opening checklist for anchors, tracks, locks, and panels. This approach reduces the chance of leaving one weak connection unnoticed.
Prevent Loose Storm Shutters From Returning
Prevention starts with inspections before hurricane season, not when a storm enters the forecast. Check mounting points, locks, tracks, and exposed hardware during routine exterior maintenance. Early repairs usually involve fewer damaged components and less disruption.
Keep shutter hardware clean and dry whenever practical, especially after salty weather. Salt deposits can accelerate corrosion and interfere with moving components. Rinse exterior systems appropriately when the manufacturer’s care instructions permit it.
Inspect areas where water collects around tracks, fasteners, and mounting brackets. Persistent moisture can damage finishes and encourage corrosion around connection points. Address drainage problems before they affect the shutter assembly.
Store removable panels carefully and protect them from unnecessary bending or impact. A warped panel may not seat correctly during emergency installation. Keep the correct hardware together with each panel system.
Maintain a record of repairs, replacement hardware, product approvals, and professional inspections. This documentation helps you identify recurring failures and simplifies future maintenance. It also provides useful information when replacing an aging shutter system.
Review the system after major storms even when the shutters appear functional. Strong winds can loosen connections without creating obvious exterior damage. A post-storm inspection can catch developing problems before the next weather event.
A Practical Repair Checklist for Miami Homes
Use this checklist whenever you investigate a loose storm shutter. Work through every opening instead of repairing only the connection that feels loose.
- Inspect: Look for movement, cracks, corrosion, missing hardware, and damaged tracks.
- Identify: Confirm the shutter type, manufacturer, approval information, and mounting configuration.
- Test: Check anchors, fasteners, locks, hinges, guides, and operating movement.
- Repair: Replace failed components using approved materials and installation procedures.
- Verify: Confirm proper alignment, engagement, spacing, and normal operation.
- Document: Photograph completed repairs and record replaced components.
- Escalate: Contact a qualified professional when structural damage or uncertain connections remain.
When planning other exterior work, organization matters just as much as the repair itself. A well-planned project reduces rushed decisions and overlooked details. Even an event booth setup demonstrates how preparation can improve execution under time pressure.
Final Thoughts
Fixing loose storm shutters in Miami, FL starts with identifying the actual source of movement. Tightening a screw may solve a minor issue, but failed anchors require proper repair methods. Because hurricane shutters protect vulnerable openings, every connection deserves careful attention.
Inspect your shutters now, correct minor problems early, and verify every repaired connection afterward. If the substrate, anchors, or approved installation method remains uncertain, contact a qualified professional. Taking action before storm preparation becomes urgent gives you more time to restore reliable protection.
Ready to check your shutters? Start with every anchor, track, lock, and mounting surface today. If you discover structural damage or repeated anchor failure, arrange a professional inspection before the next severe-weather threat.
Frequently Asked Questions
Why do storm shutters become loose?
Storm shutters commonly loosen because of failed anchors, corrosion, damaged masonry, worn hardware, or repeated wind movement.
Can I simply tighten loose shutter screws?
You can tighten an intact connection, but tightening will not repair a damaged anchor or weakened substrate.
Should I replace rusty shutter hardware?
Yes, replace significantly corroded hardware with manufacturer-approved corrosion-resistant components suitable for the shutter system.
Can I repair cracked masonry around a shutter?
Minor surface damage may be manageable, but structural cracks require professional evaluation before reinstalling the shutter.
When should I hire a professional?
Hire a qualified professional when anchors fail repeatedly, masonry deteriorates, hardware lacks approval, or the repair method remains uncertain.